How To Make A Wand For Anything
One thing I've learned is that having a few good sticks around can come in really handy. Another thing I've learned is that sticks are even handier if you tool them up a little. So here's a guide to spiffying up sticks for a myriad of uses!
Table of Contents
- What will this wand look like?
- Why make one?
- What you'll need
- Deciding on your wand's specs
- Deciding between green wood and dry wood
- Cutting & working the wood
What will this wand look like?
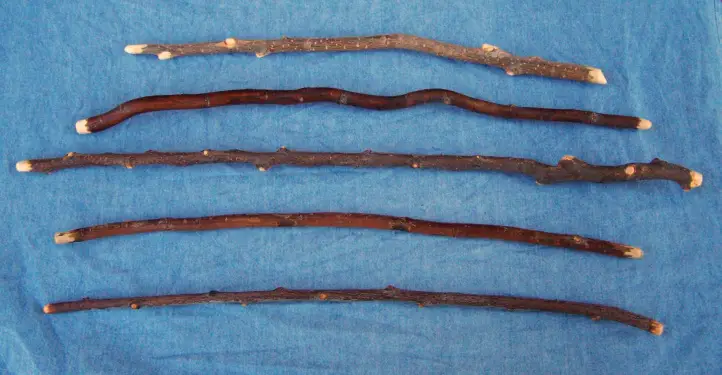
If you follow the directions, you should get something like this:

You get a very nice natural aesthetic, plus it's very durable and functional. And because the creation process doesn't take a lot of time, it's easy to make replacements and backups. And it's 100% biodegradable!
Why make one?
There are a lot of reasons you might want to have a wand (or three) around, including:
- Pulling down old cobwebs.
- Lifting up things that might have something nasty underneath.
- Using as a handle to attach a cat toy on a string to.
- Shooing flies off your computer screen.
- Scratching your back, scalp, face, or wherever. (This can help minimize the transfer of damaging body oils to paper if you're reading, drawing, etc.)
- Dressing up as a witch or wizard for Halloween.
- Using for a stage or LARP prop.
- Making something for the kids to play with.
- Having a magic wand to call your very own!
What you'll need
First thing you'll need to do is make sure you've got the right tools for the job:
- A set of large gardening pruners
- A set of small gardening pruners
- A craft knife/hobby knife
- Small wire cutters
- Toenail clippers
- Sandpaper or file (optional)
Deciding on your wand's specs
Depending on what you plan to use your wand for, you'll be looking for different qualities in the wood. A few things to consider:
Length: If you're planning to pull down cobwebs, then it should probably be pretty long - as long, or even a little longer than your arm wouldn't be bad. On the other hand, twelve to fifteen inches usually works nicely for a costume wand.
Straightness: Straighter wood is usually preferable if you plan to use your wand for utility purposes, but irregularly-shaped branches can give character to a costume piece.
Strength: Anything you plan to use for lifting or prodding should be strong enough not to snap. On the other hand, costume wands and personal scratchers don't need to be quite so tough.
Type of bark: Bark comes in all colors and consistencies. If your wand is intended for costume use, you might want to find something that has a complementing color. You might also wish to avoid particularly rough barks, as they can be uncomfortable to hold and are prone to chipping and flaking off.
Deciding between green wood and dry wood
You can start your project by cutting either green (live) wood, or dry (dead) wood. Either one can work just as well, but each has pros and cons to consider.
Green wood pros:
- It's easier to cut.
- Less risk of the wood splintering when you cut it.
- The bark is more likely to be in good shape.
Green wood cons:
- If you start working it before it dries, you may end up with small cracks in the tips of your wand.
- You risk hurting the tree if you don't know what you're doing when you cut it.
- There is a higher risk of tearing the bark.
- You don't have to wait to start working it.
- There's little risk of hurting the tree when you cut it.
- There is less risk of tearing the bark.
- It's harder to cut.
- More likely to splinter when you cut it.
- If it's been dead for a long time, the bark might be in bad shape.
- The integrity of the bark. (You want it in the best condition you can get.)
- The size of the twigs sticking off the sides. (The smaller, the better - smaller twigs are easier to trim off and smooth down.)
- The straightness of the branch. (Straight or irregular depending on your preferences!)
- The width of the branch. (Too thick and it'll be hard to cut; too thin and it'll be too delicate to work with. 1.5cm - about the width of a typical six-sided die - makes a good maximum, and 0.8cm - about the width of a typical pen - makes a good minimum.)
Dry wood pros:
Dry wood cons:
You'll have to weigh the pros and cons for yourself and decide what you want to work with. If you think you might end up cutting green wood, you might look into a few how-tos on pruning so you can minimize damage to the tree.
Cutting & working the wood
Grab your large pruners and try to find yourself a suitable branch. When you select your branch, try to find one with a good "wand area" in it. Factors to consider include:
Whether your wood is live or dead, the best cuts are made with a single, smooth snip - this is the least likely to cause unwanted damage to the wood or bark. If you're cutting dry wood, it's best to cut a bit ahead from where you want the wand to terminate so you don't end up with cracks spoiling the areas you wanted to use.
Cut off your branch, then cut it at the top and the bottom according to the length you want and where the best wand area is. Then nip any leaves or twigs growing off the side with a small pair of pruners. (But don't try to cut it exactly flush to the bark, or else you risk damaging it. Leave about 1cm.)
If you're using green wood, you'll want to leave it to dry for a few weeks. If not, you can continue right away.
Once your wood is ready, it's time to tool it. First, there are the twigs on the side to contend with. What I often do is grab a pair of wire cutters and use them to cut them off as near to the branch as I can get. Squeeze slowly but firmly when you do this, and do not twist or pull. Also be aware that twig bits can go flying off anywhere, so you may want to wear eye protection.
If you've done this right, you should end up with a slightly pointy nub where the twig was. (You might have to use the wire cutters to take it down a bit on the sides.) Once you've gotten it down as far as you can get it, grab a pair of toenail clippers and use them to trim the nub down further. (Wood bits can go flying here, so again, eye protection is good.) When you're done, you should have a rounded nub that does not poke into your skin when you clasp the wand in your hand. Here's an example of some finished nubs:

For twigs that are too large to be removed with the wire cutters, you can use a pair of small pruners. Cut it as close to the branch as you can with the sharp side coming down from the narrow end. Again, squeeze it - do not wiggle or pull the pruners. (However, you may wiggle at the twig from above if it's hard cutting all the way through.) When it's come off, you can nip at the nub from a few angles with the pruner to get it down as much as possible; then, you can use the wire cutters to get a bit more wood off and pinch it down to a pointy nub. You can also use your knife to whittle the nub down, but be very careful - it's easy to slip and damage the bark.
After that, use your knife to cut the bark off the ends, tapering down gently down through the layers to the wood beneath. Use gentle, shallow strokes; don't try to cut it off in chunks! If you do this right, you won't have to worry about the bark fraying and pulling off when you use your wand. If your wood cracked when you cut it, make sure you whittle off the cracked areas.
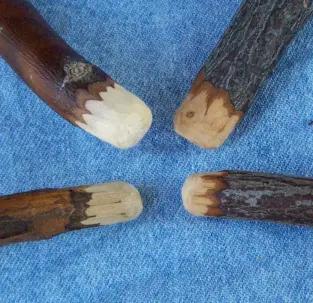
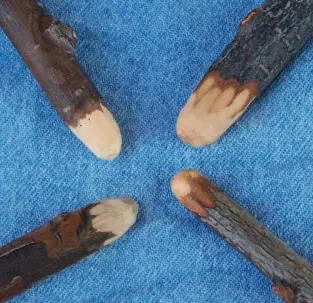
Both ends should be beveled off. The wide end can be a bit flat on the bottom, but the narrow end will look a bit better if it's rounded. (But don't try to narrow it down to a pencil point tip; this will make it prone to fraying.)
You can also sand or file down the exposed wood to make it smoother. If you don't have sandpaper on hand, rubbing the tips down on concrete can do a passable job.
Here are some examples of finished ends - bottoms on the left, tips on the right:


And that's it. You're done! Go forth and use your wand for awesome.
You might also check out:
Magic Wand Generator
American Mage Name Generator
Quirky British/Harry Potter Style Name Generator
Tips & Ideas To Create More Believable Sword 'n Sorcery Worlds
Magical & Supernatural Tropes To Reconsider (And Tips To Build Up Your Magical/Supernatural Settings!)
Keeping Magic From Taking Over Your Story